This page is a brief introduction to image processing. We'll confine ourselves to grayscale images and will consider only a few basic image processing operations. Conceptually, a digital image consists of a rectangular array of picture elements (known as pixels) in which each pixel is assigned its own color. In essence, an image that is 640 pixels wide and 480 pixels high divides the scene into 307,200 (640x480) tiny squares; each square corresponding to a pixel. The color of each pixel is the average color of the corresponding portion of the scene.
To keep things simple, we will only consider grayscale images in which the color of each pixel is a shade of gray. Typically, there are 256 shades of gray ranging from black to white. These shades of gray are coded as unsigned one-byte integer values with 0 corresponding to black and 255 corresponding to white. These pixel values can also be thought of as the intensity of the light where a greater intensity corresponds to a brighter pixel. Black corresponds to an intensity of 0 and white corresponds to an intensity of 255.
At its simplest, a grayscale image file contains one-byte unsigned integer values; one byte per pixel. The pixel values are stored on a row by row basis. That is the data proceeds from the upper-left most pixel across the top of the image to the upper-right most pixel. This is followed by the data for the second row from left to right, and so on. This file format is generally known as a raw format. Notice, in particular, that the dimensions of the image are not stored as part of the file. In order to read the image file, the image dimensions must come from some other source.
In this course, we will be using index files to store a list of image files all having the same dimensions. The index file will contain a description of the collection, the information needed to determine the size of the image, and a list of the image names and corresponding file names. Four of the index files contain LandSat images taken in the 1980's. Each index file corresponds to a particular location and the different image files represent the same terrain as seen through rather narrowly defined bandwidths of light; typically blue, green, red, and infrared. Two of the index files contain four images of a scene using blue, green, and red bandwidths and a fourth composite (normal grayscale) image. The final index contains a number of normal grayscale images.
Conceptually, the pixel values for a given image are read into a two-dimensional array in which the number of columns corresponds to the width of the image (in pixels) and the number of rows corresponds to the height of the image (also in pixels). For example, an image that is 640 pixels wide by 480 pixels high would be stored in memory as a two-dimensional array having 640 columns and 480 rows.
In our case, each pixel is represented by an unsigned one-byte intensity in the range 0 to 255. In C++, the char data type is used to store a one-byte signed integer (-128 to 127). We need an unsigned char type variable to store a value in the range 0 to 255. (Of course we could also use an int or unsigned int to store values in the range 0 to 255 but that would require four times as much memory.)
Ideally, the array dimensions and the image dimensions are the same. This presents a bit of a problem in C++. The only way to declare a two-dimensional array with specific dimensions is to use static allocation:
unsigned char image[480][640];
This allocates a contiguous block of memory large enough to store the entire image. The problem is that you must know how big the image will be when you write your program. While it would be possible to store images with smaller dimensions (at the expense of wasted memory) in this array, you'd be out of luck with larger images. Later, when we look at binary file input, we'll see that there are some issues associated with loading smaller images into the array that make this approach too limiting.
The obvious solution is to dynamically allocate the memory you need for an image during program execution. Unfortunately, C++ does not allow you to dynamically allocate a two-dimensional array. The following allocation request is not allowed:
unsigned char* image;
width = 640;
height = 480;
image = new unsigned char[height][width];  <= This is not allowed in C++
One way around this problem is to create the two-dimensional array as an array of arrays:
unsigned char** image;
width = 640;
height = 480;
image = new unsigned char* [height];
for (int row = 0; row < height; row++)
{
    image[row] = new unsigned char [width];
}
The variable "image" is defined as a pointer to a pointer. The value of "image" is the address of a memory location that stores the address of an unsigned character pointer (or, in this case, an array of unsigned character pointers). Memory is dynamically allocated for an array of unsigned char pointers and the address of this block of memory is assigned as the value of image. Recall that the value of any array variable is the address of the first item in the array. The value of image is the address of the first item in an array of unsigned character pointers.
Within the body of the loop, each unsigned char pointer in the array of pointers is assigned the address of a dynamically allocated array of unsigned characters. Each unsigned char pointer points to the first item in an array of unsigned char values. Consequently, "image" is an array of arrays. Once the for loop has terminated, "image" can be treated in all respects as though it were a two-dimensional array. That is, the normal subscript notation can be used to specify the desired row and column.
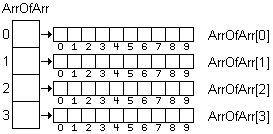
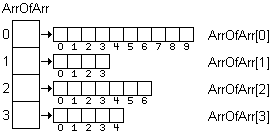
While an array of arrays can be treated as though it were a two-dimensional array there are two significant differences. First, the memory is allocated for the array on a piecemeal basis. Consequently, the array of arrays is not one contiguous block of memory. Second, there is no requirement that the length of each array in the array of arrays be the same size. In fact, they can be of different sizes as illustrated here:
A second approach is to use a one-dimensional array to implement a two-dimensional array. This approach has two distinct advantages. First it allows us to dynamically allocate the exact amount of memory needed for an image as a single contiguous block of memory. This greatly facilitates reading the image data from a binary file into memory. The second advantage is that it actually simplifies some of the image processing algorithms since processing all of the elements in a one-dimensional array is easier (and faster) than accessing all of the elements in a two-dimensional array.
Recall that the calculation of the physical address of an element in a one-dimensional array looks like this:
address = baseAddress + [index] * sizeOfElement
In this calculation, the baseAddress is the address of the array (the value of the array variable). The complier can determine the size of each element in the array from the data type in the declaration of the array variable. In our gray-scale image files, the size of each data element is one byte and the calculation becomes:
address = baseAddress + index
Recall, that a statically allocated two-dimensional array is a contiguous block of memory in which the data is stored row by row; the first row, then the second row, then the third and so on. As a result, the calculation of the physical address of an element in a two-dimensional array is more complicated:
address = baseAddress + rowIndex * sizeOfRow + columnIndex * sizeOfElement
        = baseAddress + rowIndex * (numCols * sizeOfElement) + columnIndex * sizeOfElement
        = baseAddress + [rowIndex * numCols + columnIndex] * sizeOfElement
Notice that the sizeOfRow is just the number of columns (i.e., the number of elements) in each row times the size of each element; both of which can be obtained from the declaration of the two-dimensional array. Since the size of each data element in a grayscale image is one byte, the calculation simplifies to:
address = rowIndex * numCols + columnIndex
        = y * width + x
where (x, y) is the pixel location and width is the width of the image (in pixels). Consider the following code fragment:
unsigned char* image;
width = 640;
height = 480;
image = new unsigned char[width * height];
Notice that we have dynamically allocated a one-dimensional array exactly large enough to store the entire image. The question, then, is how do I access the pixel at (x, y)? Obviously, I cannot use row and column indexes, as in image[y][x], because this is not a two-dimensional array. However, I can perform the same arithmetic that is implied by the indexing notation:
image[y * width + x]
where (x, y) is the pixel location and width is the width of the image (in pixels).
Up until now, the only kind of files that we have dealt with have been text files. While pixel intensities could be stored in a text file, the resulting file is much larger than the corresponding binary file. In a space delimited text file, each intensity would require from 2 to 4 characters (1 to 3 digits and the space that separates one intensity value from the next). That means each intensity would require 2 to 4 bytes. Another option, would be to store each intensity as a 3 character string with no spaces between one string and the next. In either case the resulting file would be 3 to 4 times larger than a binary file in which each intensity is stored as a one-byte unsigned char value.
We have been using a version of the open function that has only one parameter; the name of the file. There is a second version of the open function that has two parameters: the name of the file and the file mode. The valid file modes are defined as part of the base ios class. To open a file as a binary data file, we need to specify the mode as ios::binary:
fileVar.open(fileName, ios::binary)
You can use the normal extraction and insertion operators to read text data from a file opened in binary mode. However, you cannot use these operators to read or write binary data. To read binary data, you need to use the read( ) function which has two parameters; the address of a buffer (the location in memory where the data will be stored) and the number of bytes to read. Obviously, the buffer must be large enough to store the specified number of bytes. In the code fragment below, the size of the image is 640 x 480:
unsigned char* image;
width = 640;
height = 480;
ifstream infile;

image = new unsigned char[width * height];  // Allocate memory for the image
infile.open("MyImage", ios::binary);        // Open the image file
infile.read(reinterpret_cast <char*> (image), width * height);  // Read the image into memory
Notice that in the read function, we are specifying that the variable "image" is to be interpreted as an array of characters for the purposes of the this read operation. This is the way C++ specifies that the buffer is to be thought of as a contiguous block of bytes during this read operation. Both characters (values -128 to 127) and unsigned characters (values 0 to 255) are one-byte data types in C++. The designers of C++ chose the char data type to represent binary data. (I think the unsigned char type would have been a better approach but they didn't ask me.) Since we declared our array as an array of unsigned characters, we have to cast it to an array of characters in order to use it as the buffer for the read function.
Notice that we can read the entire image into memory with a single read statement. It is not necessary to read it in on a pixel by pixel basis. This is one of the advantages of reading binary data.
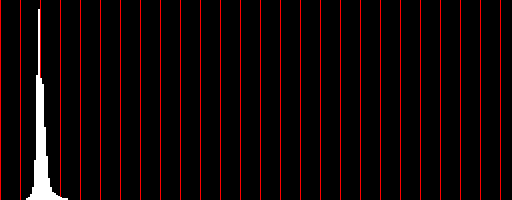
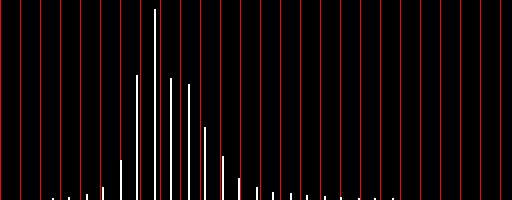
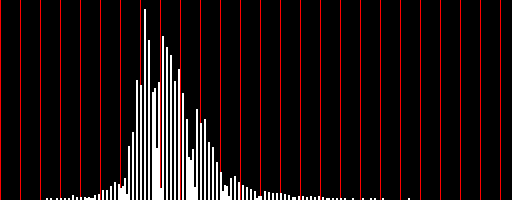
The frequency distribution of pixel intensities tells us how many pixels in the image have each possible intensity value (0 to 255). It is an array of 256 integers. The array index is the corresponding intensity. So, for example, freq[0] is the number of pixels in the image with an intensity of 0 and freq[255] is the number of pixels that have an intensity of 255. In the graphic below, the frequency distribution of pixel intensities for the image is illustrated to the right of the image. The vertical red bars represent pixel intensities of 0, 10, 20, and so on. Notice that the pixel intensities in this image range from about 12 to about 33 making the image very dark and with little variation. (This is a LandSat image of West Point in blue light.) The frequency distribution can be found by performing a linear pass through the one-dimensional array of pixel intensities and updating the appropriate counter for each pixel intensity value.
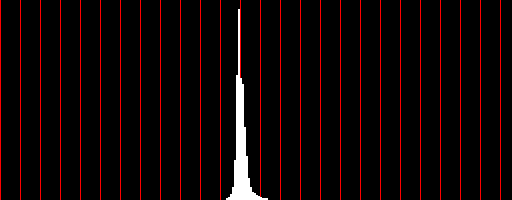
The brightness of an image can be adjusted by performing a linear traversal of the one-dimensional array of pixel intensities adding the same value to the intensity of every pixel. Adding a positive value will make the image brighter and adding a negative value will make the image darker. In the graphic below, the example image was brightened by adding 100 to the intensity of every pixel. Notice that there is still very little variation in the pixel intensities (which range from about 112 to 133).
Unfortunately, adjusting the brightness of an image is not quite as simple as it seems. Suppose you want to add 100 to the intensity of every pixel and suppose a given pixel currently has an intensity of 156. What would its new intensity be? If you said its new intensity would be zero, you are correct. Pixel intensities are stored as one-byte unsigned characters (0 to 255). In binary, 100 + 156 yields a sum of 0 with a carry of 1 that is lost:
 11111 <- carries
 01100100
+10011100
---------
100000000
Conceptually, what we would like to do is add the change in brightness to every pixel and if that brightness exceeds 255 set it back to 255. If we were decreasing the brightness, we would check to see if the new intensity was negative and, if so, reset it to zero. We might, naively, think that the following code fragment would work:
intensity = intensity + delta;
if (intensity > 255)
{
    intensity = 255;
}
else if (intensity < 0)
{
    intensity = 0;
}
There are two problems with this logic. The first is that if the arithmetic is being done using unsigned character values, the delta value can never be negative (since there are no negative unsigned character values). The second problem is that neither of the conditions will ever evaluate to true because an unsigned character cannot have values greater than 255 or less than 0. There are at least two solutions to this problem.
One solution is to cast each pixel intensity to an integer, add the brightness adjustment (a signed integer), modify the result as necessary, and cast the resulting integer value back to an unsigned char value. In the code fragment below, newIntensity is an integer (int) variable.
newIntensity = int(intensity) + adjustment;
if ( newIntensity > 255)
{
    newIntensity = 255;
}
else if (newIntensity < 0)
{
    newIntensity = 0;
}
intensity = (unsigned char)newIntensity;
The second solution requires a selection structure to perform the correct operation on each pixel. The temporary variable, change, is an unsigned character.
if (adjustment > 0)  // brighten the image
{
    change = (unsigned char)adjustment
    if (intensity > 255 - change)  // same as: intensity + change > 255
    {
        intensity = 255;
    }
    else
    {
        intensity = intensity + change;
    }
}
else // adjustment < 0 so darken the image
{
    change = (unsigned char)(-adjustment);
    if (intensity < change)      // same as: intensity - change < 0
    {
        intensity = 0;
    }
    else
    {
        intensity = intensity - change
    }
}
In the main if clause, the brightness adjustment is positive which means we want to brighten the image. In that case we have to guard against overflow where intensity plus change (the adjustment as an unsigned char value) is a value greater than 255 (using normal arithmetic):
intensity + change > 255
This test won't work with unsigned character values because the sum on the left can never exceed 255 due to overflow. Subtracting change from both sides of the inequality yields the following inequality which will work with unsigned character values since the subtraction on the right cannot result in an underflow (a value less than zero):
intensity > 255 - change
This test can be made more efficient by calculating the value of 255 - change and storing the result in a variable. That avoids the necessity of performing the subtraction every time the test is performed (i.e., for every pixel in the image).
The test in the else clause (to darken an image) is derived in a similar fashion. In this case the negative adjustment is converted to a positive value that will be subtracted from the current intensity (because adding a negative is the same as subtracting a positive). We have to guard against underflow where the intensity minus the change is less than zero (using normal arithmetic):
intensity - change < 0
This test won't work with unsigned character values because the difference on the left can never be less than zero due to underflow. Adding change to both sides of the inequality yields the following result which will work for all possible values of intensity and change:
intensity < change
The contrast of an image is the difference between the intensities of the darkest and brightest pixels in an image. In some cases, increasing the contrast will make it easier to see details in an image. Adjusting the contrast of an image involves mapping the existing pixel intensities onto a new range of values. Suppose that in our brightened image above, we want to map intensities less than or equal to 110 to an intensity of 0 (black) and intensities greater than or equal to 140 to an intensity of 255 (white). The linear mapping function would be:
![]()
The contrast can be adjusted by performing a linear traversal of the one-dimensional array of pixel intensities and applying the mapping function to every pixel. Notice that intensities less than 110 would map to negative values. These values would have to be adjusted upward to zero. Similarly, intensities greater than 140 would map to values greater than 255 and would have to be adjusted downward to 255. The contrast enhanced image looks like this:
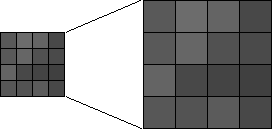
Reducing an image to half its size means the new image is half as wide as the original and half as high. It would have only one-fourth as many pixels as the original. Each pixel in the new smaller image corresponds to a 2 x 2 block of pixels in the original image. In the illustration below, the 8 x 8 block of pixels has been reduced to half its size (a 4 x 4 block of pixels). The intensity of each pixel in the new image is the average of the intensities of the four corresponding pixels in the original image.
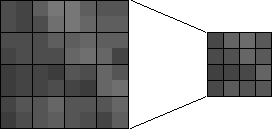
This is the first context in which the pixel data must be thought of as a two-dimensional array rather than a one-dimensional array. Given any pixel in the new image, its intensity is the average of the four corresponding pixels in the original image. Consider the pixel at (2,3) in the new (reduced) image:
new[3][2] = ( old[6][4] + old[6][5] + old[7][4] + old[7][5] ) / 4
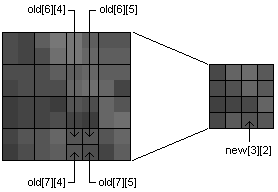
Because we are storing the pixel data in a one-dimensional array rather than a two-dimensional array, this same arithmetic would have to be written as follows where W is the width of the original image and w is the width of the new image (w = W/2):
new[3*w+2] = ( old[6*W+4] + old[6*W+5] + old[7*W+4] + old[7*W+5] ) / 4
We can reduce the number of multiplications needed as follows:
loc = 6*W + 4
new[3*w+2] = ( old[loc] + old[loc+1] + old[loc+W] + old[loc+W+1] ) / 4
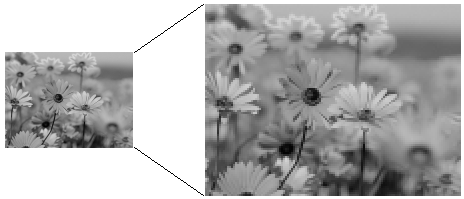
In the graphic below, the contrast enhanced image of West Point has been reduced to half its size:
When halving the size of an image, you must dynamically allocate memory for the new image and then determine the intensity of each pixel in the new image. When you are done, you can de-allocate the memory for the original image, close the graphics window for the original image, and open a new graphics window for the new image.
When you halve the size of an image, you lose most of its information. When you double the size of an image (i.e., double the width and double the height) you quadruple the number of pixels in the image. As a result, you have to make up or manufacture the pixel intensities of 75% of the enlarged image. Each pixel in the original image corresponds to a 2 x 2 block of pixels in the new image. One of these four pixels will have the same intensity as the original but the remaining three values are manufactured.
A simplistic approach to doubling the size of an image is to copy the intensity of each pixel in the original image into all four of the corresponding pixels in the larger image:
While very easy to implement, this approach results in an image that is obviously grainy. In the illustration below, the larger image is double the size of the smaller and was creating using this method. Notice that the edges of the petals and the stems (especially the diagonal edges) are quite jagged.
A more sophisticated way to enlarge an image is to set the intensity of each new pixel to the average intensity of the surrounding pixels. In the illustration below, the intensity of each pixel in the original image, at (x, y), is copied into the new image at (2x, 2y):
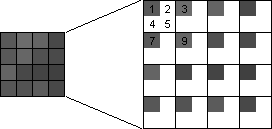
Pixels 1, 3, 7, and 9 came from the original image. The intensity of pixel 2 is the average of the intensities of pixels 1 and 3. The intensity of pixel 4 is the average of the intensities of pixels 1 and 7. The intensity of pixel 5 is the average of the intensities of pixels 1, 3, 7, and 9. In every case, the intensity of the new pixel is the average of the adjacent pixels (from the original image). These averages must be calculated as integer values with the final result cast back to an unsigned character. In the illustration below, the enlarged image is a little less grainy than the image we generated above.

In most cases, the result of doubling the size of an image is disappointing. That should not be surprising when you stop to think that 75% of the pixels in the image have estimated intensity values. There is just no way to accurately determine the correct intensities for these pixels and the image quality suffers as a result.
When doubling the size of an image, you must dynamically allocate memory for the new image and then determine the intensity of each pixel in the new image. When you are done, you can de-allocate the memory for the original image, close the graphics window for the original image, and open a new graphics window for the new image.
A convolution filter is an n x n matrix (where n is odd) of weights. The intensity of the pixel at the center of the convolution filter is set equal to the weighted sum of the intensities of the pixels covered by the filter. The intensity of each pixel covered by the filter (including the center pixel) is multiplied by the corresponding weight in the filter. The new intensity of the center pixel is the sum of these products. As usual, if the result is greater than 255 it is decreased to 255 and if the result is negative it is increased to 0. (In some cases, the weighted sum is divided by a constant value and/or a constant offset is added to the result.)
In the example below, the specified 3 x 3 convolution filter is applied to pixels 6 and 7 in the image:
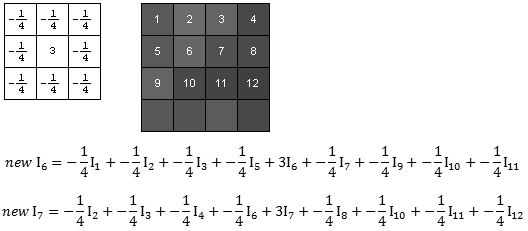
Notice that the convolution filter cannot be applied to the edge pixels, since the convolution filter must be centered on the pixel to which it is applied. The intensity values for the edge pixels in the new image are the same as the for the edge pixels in the original image.
As with the image resizing algorithms discussed above, you must allocate memory for the new image, determine the intensity of each pixel in the new image and then de-allocate the memory for the original image. You cannot apply the filter in place because changing the intensity of a pixel messes up the calculations for the remaining pixels. For example, if you were to change the intensity of pixel 6 in the original image array, the calculation of the new intensity of pixel 7 would be incorrect since it would use the new intensity of pixel 6 (which you just changed) rather than the original intensity of pixel 6.
You should also note that the arithmetic needed for applying the filter must be done using double values since the filter weights can have any value. (There are ways to get around this, but we won't worry about it for now.)
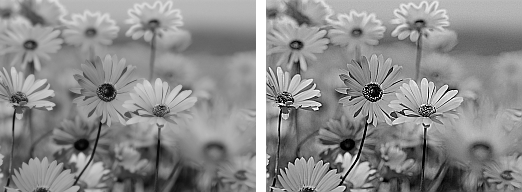
To sharpen an image, you can apply the following convolution filter to each interior pixel:

The image on the right is the sharpened version of the image on the left:
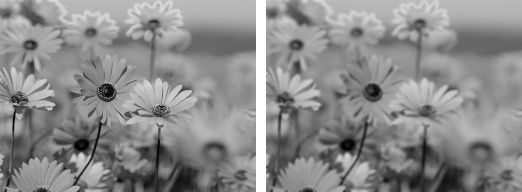
To blur an image, you can apply the following convolution filter to each interior pixel:

The image on the right is the blurred version of the image on the left: