This is the first microprogramming tutorial.
The purpose of this tutorial is to learn how to access data path registers in a microprogram. The example program reads a value from register 6 (CPP) and stores it in both register 4 (SP) and the H register. Before continuing, you should read the sections on the microinstruction format and editing microprograms.
![]() 1. Go to the microprogram editor by clicking on the
Microprogram Editor tab:
1. Go to the microprogram editor by clicking on the
Microprogram Editor tab:
![]()
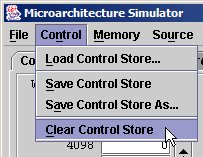
![]() 2. Clear the control store:
2. Clear the control store:

![]() 3. Set the "Next Addr" field of the first
microinstruction to 000000001.
3. Set the "Next Addr" field of the first
microinstruction to 000000001.
![]() 4. Leave all the jump control bits set to
0.
4. Leave all the jump control bits set to
0.
![]() 5. Set the F0 and F1 bits to 1. This sets up the ALU to
generate a sum.
5. Set the F0 and F1 bits to 1. This sets up the ALU to
generate a sum.
![]() 6. Leave ENA at 0 and set ENB to 1. This sets up the ALU
to generate the sum 0 + B-Bus = B-Bus.
6. Leave ENA at 0 and set ENB to 1. This sets up the ALU
to generate the sum 0 + B-Bus = B-Bus.
![]() 7. Move over to the B Bus section and set it to
0110 loading the contents of register 6 (CPP) onto the B bus.
This sets up the ALU to generate the sum 0 + CPP (ALU = CPP)
7. Move over to the B Bus section and set it to
0110 loading the contents of register 6 (CPP) onto the B bus.
This sets up the ALU to generate the sum 0 + CPP (ALU = CPP)
![]() 8. Finally, move to the C-bus section (registers H
through MAR) and set the H and
SP bits. This will cause the value generated by the ALU to be loaded into both
the H and SP registers. The completed microinstruction should look like
this:
8. Finally, move to the C-bus section (registers H
through MAR) and set the H and
SP bits. This will cause the value generated by the ALU to be loaded into both
the H and SP registers. The completed microinstruction should look like
this:
![]()
![]() 9. Move to the second microinstruction and set the "Next
Addr" field to 011111111. Note: This is the "Halt" microinstruction
and will cause the simulator to stop.
9. Move to the second microinstruction and set the "Next
Addr" field to 011111111. Note: This is the "Halt" microinstruction
and will cause the simulator to stop.
![]()
![]() 10. If you want, you can save your microprogram (Control
menu; Save Control Store).
10. If you want, you can save your microprogram (Control
menu; Save Control Store).
![]() 11. Go to the computer simulator window by clicking on the
Computer Simulator tab.
11. Go to the computer simulator window by clicking on the
Computer Simulator tab.
![]()
![]() 12. Click the Reset button.
12. Click the Reset button.
![]() 13. Modify the contents of the CPP register as shown
here:
13. Modify the contents of the CPP register as shown
here:
![]()
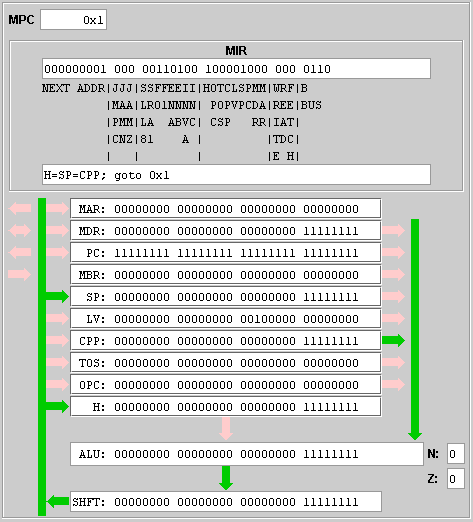
![]() 14. Click the Micro Step button to execute the first
microinstruction in your program. The data path display should verify that the
contents of CPP were copied to H and SP:
14. Click the Micro Step button to execute the first
microinstruction in your program. The data path display should verify that the
contents of CPP were copied to H and SP:

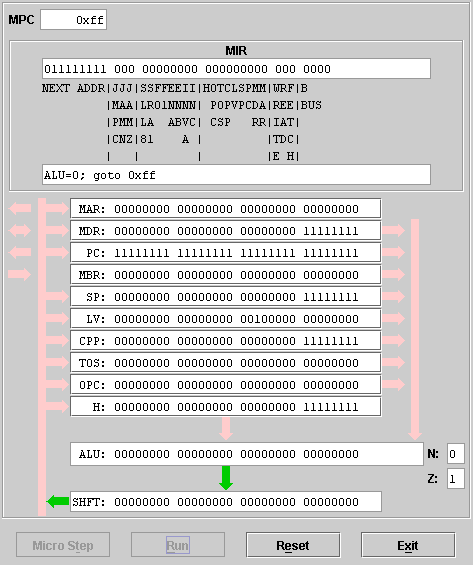
![]() 15. Click the Micro Step button a second time to
execute the micro "halt" instruction. Notice that no data was applied to the ALU
and that the value generated by the ALU and shifter was not stored anywhere. The
Micro Step and Run buttons are disabled, because the microprogram has
halted. If you press the Reset button, you can run the microprogram again.
15. Click the Micro Step button a second time to
execute the micro "halt" instruction. Notice that no data was applied to the ALU
and that the value generated by the ALU and shifter was not stored anywhere. The
Micro Step and Run buttons are disabled, because the microprogram has
halted. If you press the Reset button, you can run the microprogram again.

The next tutorial covers accessing memory in a microprogram.