This tutorial is intended to follow the tutorial on arithmetic in a microprogram.
The purpose of this tutorial is to implement branching in a microprogram. Branching is determined by three jump control bits (see Microinstruction Format for a complete description of these bits):
In the example program, you will implement a branch if the value generated by the ALU is less than or equal to zero. It takes advantage of the fact that the default value of the PC (interpreted as a signed integer) is -1. The basic logic is given below. The branch should be successful the first two times but fail the third time.
if(PC <= 0)  //  PC = -1 <  0
    SP = 1;
else
    SP = 0;

PC++;
if(PC <= 0)  //  PC = 0
    SP = 1;
else
    SP = 0;

PC++;
if(PC <= 0)  //  PC = 1 >  0
    SP = 1;
else
    SP = 0;
![]() 1. Go to the microprogram editor.
1. Go to the microprogram editor.
![]() 2. Clear the control store.
2. Clear the control store.
![]() 3. Set the "Next Addr" field to 000000001.
3. Set the "Next Addr" field to 000000001.
![]() 4. Set the JMPN and JMPZ bits to 1 to implement a
conditional jump. If the branch succeeds, the instruction at 0x101 will be
executed. Otherwise, the instruction at 0x001 will be executed.
4. Set the JMPN and JMPZ bits to 1 to implement a
conditional jump. If the branch succeeds, the instruction at 0x101 will be
executed. Otherwise, the instruction at 0x001 will be executed.
![]() 5. Set up the ALU and B-bus control bits so that ALU = PC
(register 1).
5. Set up the ALU and B-bus control bits so that ALU = PC
(register 1).
This instruction will be executed if the branch in the previous instruction fails.
![]() 6. Write a microinstruction that loads a value of zero
into the SP register. The next instruction is at 0x002.
6. Write a microinstruction that loads a value of zero
into the SP register. The next instruction is at 0x002.
This instruction will increment the value in the PC and, at the same time, perform the second conditional test.
![]() 7. Set the "Next Addr" field to 000000011.
7. Set the "Next Addr" field to 000000011.
![]() 8. Set the JMPN and JMPZ bits to 1 to implement a
conditional jump. If the branch succeeds, the instruction at 0x103 will be
executed. Otherwise, the instruction at 0x003 will be executed.
8. Set the JMPN and JMPZ bits to 1 to implement a
conditional jump. If the branch succeeds, the instruction at 0x103 will be
executed. Otherwise, the instruction at 0x003 will be executed.
![]() 9. Set up the ALU, B-bus, and C-bus fields so that PC =
PC + 1.
9. Set up the ALU, B-bus, and C-bus fields so that PC =
PC + 1.
This instruction will be executed if the branch in the previous instructions fails.
![]() 10. Place the edit cursor anywhere in the
instruction at 0x001 (setting SP to 0). Copy that instruction by
entering Ctrl-C. (You do not have to perform a selection operation first.)
10. Place the edit cursor anywhere in the
instruction at 0x001 (setting SP to 0). Copy that instruction by
entering Ctrl-C. (You do not have to perform a selection operation first.)
![]() 11. Place the edit cursor anywhere in the
instruction at 0x003. Enter Ctrl-V to paste the instruction you just copied.
11. Place the edit cursor anywhere in the
instruction at 0x003. Enter Ctrl-V to paste the instruction you just copied.
![]() 12. Edit the "Next Addr" field to point to 0x004.
12. Edit the "Next Addr" field to point to 0x004.
![]() 13. Copy the "increment PC and conditional
branch" instruction at 0x002 to address 0x004.
13. Copy the "increment PC and conditional
branch" instruction at 0x002 to address 0x004.
![]() 14. Modify the "Next Addr" field so that it points to
address 0x005. If the jump succeeds, the instruction at address 0x105 will be
executed. Otherwise, the instruction at address 0x005 will be executed.
14. Modify the "Next Addr" field so that it points to
address 0x005. If the jump succeeds, the instruction at address 0x105 will be
executed. Otherwise, the instruction at address 0x005 will be executed.
This instruction will be executed if the branch in the previous instruction fails.
![]() 15. This is the final SP = 0 statement. Copy the
instruction at 0x003 to 0x005 and modify the "Next Addr" field to point at 0x006.
15. This is the final SP = 0 statement. Copy the
instruction at 0x003 to 0x005 and modify the "Next Addr" field to point at 0x006.
![]() 16. Write a micro "halt" instruction.
16. Write a micro "halt" instruction.
This instruction will be executed if the first conditional test (at 0x000) succeeds.
![]() 17. Scroll down to address 0x101 and write an instruction that implements SP = 1. The
next address should be 0x002.
17. Scroll down to address 0x101 and write an instruction that implements SP = 1. The
next address should be 0x002.
This instruction will be executed if the second conditional test (at 0x002) succeeds.
![]() 18. Copy the microinstruction at 0x101 and
change the Next Addr to 0x004.
18. Copy the microinstruction at 0x101 and
change the Next Addr to 0x004.
This instruction will be executed if the third conditional test (at 0x004) succeeds.
![]() 19. Copy the microinstruction at 0x101 and
change the Next Addr to 0x006 (the micro "halt" instruction). Note: You could
also set the "Next Addr" field of this instruction to 0xFF but I prefer to have
a single exit point.
19. Copy the microinstruction at 0x101 and
change the Next Addr to 0x006 (the micro "halt" instruction). Note: You could
also set the "Next Addr" field of this instruction to 0xFF but I prefer to have
a single exit point.
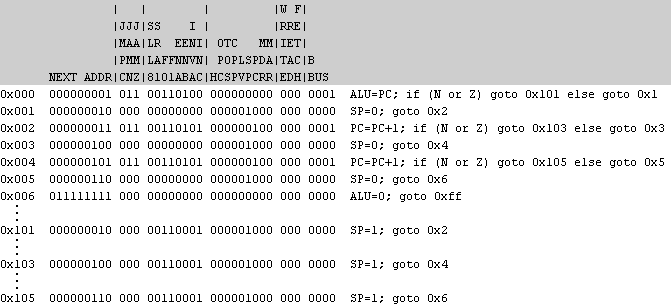
Here is the complete microprogram:
If you want, you can save your microprogram (Control menu, Save Control Store option).
![]() 20. Go to the computer simulator window.
20. Go to the computer simulator window.
![]() 21. Click the Reset button.
21. Click the Reset button.
![]() 22. Click Micro Step. The N flag is set
indicating that the ALU < 0. The value in the MPC is 0x101 indicating
that the jump succeeded.
22. Click Micro Step. The N flag is set
indicating that the ALU < 0. The value in the MPC is 0x101 indicating
that the jump succeeded.
![]() 23. Click Micro Step. The value 1 is loaded into SP
and the next instruction is at 0x2.
23. Click Micro Step. The value 1 is loaded into SP
and the next instruction is at 0x2.
![]() 24. Click Micro Step. The value of PC is incremented
(to 0).
The Z flag is set indicating that the ALU = 0. The value in the MPC is
0x103 indicating that the jump succeeded.
24. Click Micro Step. The value of PC is incremented
(to 0).
The Z flag is set indicating that the ALU = 0. The value in the MPC is
0x103 indicating that the jump succeeded.
![]() 25. Click Micro Step. The value 1 is loaded into SP
and the next instruction is at 0x4.
25. Click Micro Step. The value 1 is loaded into SP
and the next instruction is at 0x4.
![]() 26. Click Micro Step. The value of PC is incremented
(to 1).
Neither the N flag nor the Z flag is set indicating that ALU > 0. The value
in MPC is 0x5 indicating that the jump failed.
26. Click Micro Step. The value of PC is incremented
(to 1).
Neither the N flag nor the Z flag is set indicating that ALU > 0. The value
in MPC is 0x5 indicating that the jump failed.
![]() 27. Click Micro Step. The value 0 is loaded into SP
and the next instruction is at 0x6.
27. Click Micro Step. The value 0 is loaded into SP
and the next instruction is at 0x6.
![]() 28. Click Micro Step. The microprogram
terminates.
28. Click Micro Step. The microprogram
terminates.
This is the last tutorial on microprogramming.